How to add a single product
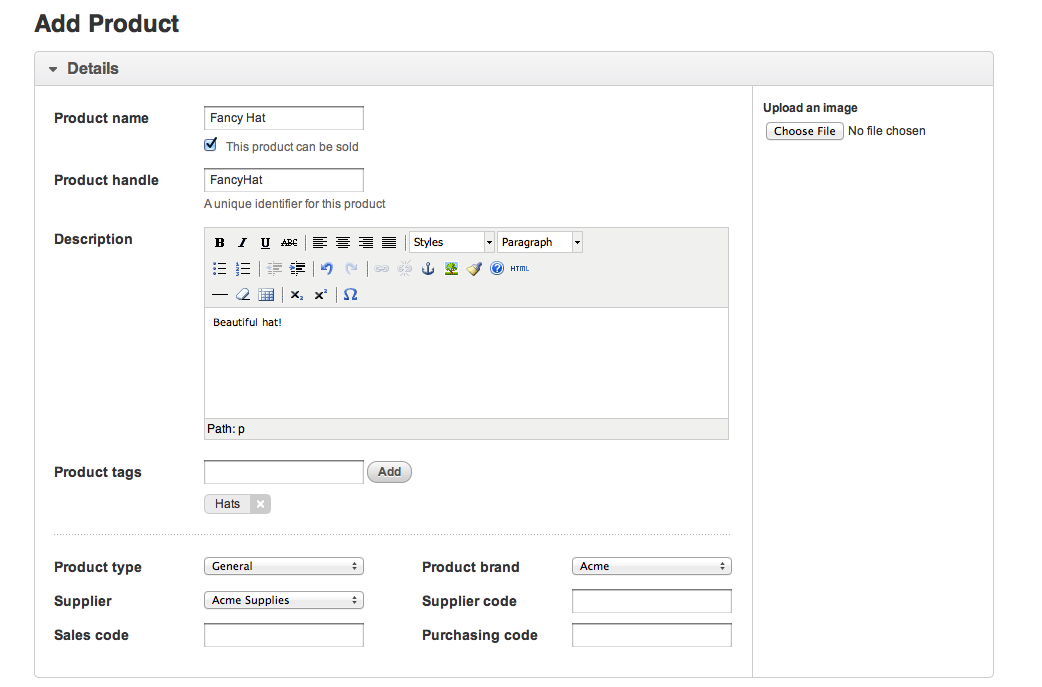
From the 'Products' tab, click the button labelled 'New Product'. Complete the fields appropriate for your store(s).

Important: You should avoid using commas in fields wherever possible. Do not put commas in your product name or product handle.
Details:
1. Name your product
2. Vend will create a handle for you. You can change this, but it must be unique.
3. If you don't want this product to be immediately available for sale, un-tick the 'Available to be sold' box.
4. Add a description of your product. This might be selling points for your staff and care instructions.
5. To add an image, simply click 'Add Image'. This will direct you to your computer's files. Double click on the correct image. The maximum image size is 2mb.
6. Categorise your product. There are two ways within Vend to categorise products. These are tags and types.
Product type
-
One product type can be assigned per product. For this reason many retailers use the 'Product type' to assign the product to a broad category. Reports can also be filtered by type. For example a cafe setup may have product types of:
- cabinet food
- blackboard menu
- hot drinks
- cold drinks
Tags
Products can have multiple tags which can be reported on using the 'Sales by Tag' report. These can be used to define more precise characteristics of a product.
Retailers may find different ways of using Types and Tags to categorise their products, however we hope you find this a useful starting point.
7. To add new brands and suppliers simply click the button 'Add Brand' or 'Add Supplier' and complete the fields. If you are ordering your product from multiple suppliers, leave the supplier field blank.
Pricing
1. Complete the pricing information by inputting your supply price and adjusting the % markup to the appropriate number for your operation. Your retail price will be automatically calculated.
2. Choose the correct tax rate, your retail price including tax will be automatically calculated.
3. For more information about setting a custom tax rate:
Inventory
SKU Codes
- Sku codes are used to generate the barcodes in Vend.
- If you have existing barcodes or supplier barcoded products, you can just scan or enter these into the SKU field, and your old barcodes will work with Vend.
-
If you want Vend to 'auto generate' barcodes, there are 2 options, which can be configured under general Setup.
- Alphanumeric
- Numeric sequence
Note: the smaller the SKU, the better quality the printed barcode. So if you want to use small labels, please use a smaller SKU code (4 to 8 digits)

Complete the inventory information by:
1. Leaving the inventory level blank (You should add your inventory through a stock order)
2. Adding your desired reorder point (the level of stock that will trigger this item to be added to a stock order)
3. Adding your desired reorder amount (the amount that you would like to be ordered when you fill a stock order)
By clicking 'Save' at the bottom of the page, your product will be saved and you will be taken back to the 'Product' page.
More reading
Setting up a product with variants
Related Articles
Add Assembly
The Add Assembly page enables you to create a product assembly using component products based on a Bill Of Materials. An assembled product is made up of one or more components or a single Bill of Material. You can create and edit assemblies for a ...How do I add products into Vend?
Setting up your products correctly can be crucial to the success of your store. A correct product setup can mean a speedier sales proccess, more accurate reporting and easy migration to Vend Ecommerce. A product in Vend is made up of a number of ...Product Performance Report
What is the Product Performance Report? The Product Performance Report is a hybrid between a sales report and an inventory on hand report. It allows you to compare your inventory data for a product with sales data such as item's sold per month, cost ...What are product variants and how do I set them up?
Product variants are made up of a parent product that includes basic information and a set of child products that represent different variations of this parent product. To create a product with variants you will need to turn on "This product has ...Barcoding
This feature is available on selected subscription plans. For more information, see Pricing. The barcoding feature enables single or bulk scanning of product barcodes for the following processes: Receipting Purchase Orders Stock Counts Sales ...