Setting up your DYMO 450 Turbo label printer for Windows PC
Before Getting Started:
Follow the below instructions to get your printer set up and ready to start printing barcode labels with Vend.
There are 3 steps:
1. Install the DYMO printer software
2. Set the print preferences in Windows
3. Select the label printing format in Vend.
Install the DYMO printer software (drivers)
The DYMO printer requires special printing drivers in order to print. Once we've installed them, we will be printing labels directly from Vend.
1. Download the software from DYMO's website.
2. Open the downloaded software, and follow the DYMO Setup Wizard to install the software.
3. Connect your DYMO label Printer directly to your computer via the USB cable provided.
4. Load your labels into your printer. For instructions on how to do this, please check your DYMO 450 Turbo instruction manual.
Setting the print preferences in Windows
1. Open the Start menu and navigate to the 'Control Panel'.
2. Locate the 'Devices and Printers' icon and open this.
3. Right-click on the DYMO printer and select 'Printer Properties'.

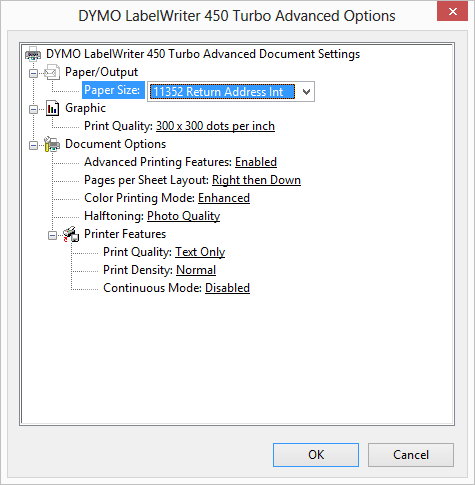
4. In the Printer Properties window, click 'Preferences' at the bottom and then 'Advanced' on the right.
5. This will open a window that shows the below settings. This allows you to verify that the paper is set to the same type of label you loaded earlier.
Select the label printing format in Vend
The DYMO 450 Turbo is a continuous printing format printer. To get your labels to print correctly, Vend needs to know this format. To set this up, follow the steps below:
1. Navigate to the Setup page.
2. On the General Setup tab, click the 'Label Printer Format' drop-down box.
3. Select 'Continuous feed', and click 'Save'.

Printing a Label in Vend
1. To print a label in Vend, go to your Vend store and choose the product to print a barcode for. Choose your label type and click on print.
.png)
2. In the Chrome Print Preview screen, click more settings and select the 'Paper Size' drop-down.
3. Find your label size code (or nearest label size code) here and click print.
Important: We strongly recommend printing out a run of 5 or more barcodes as a test to ensure that the alignment is correct.
Looking to print a bulk run of labels? You can do this through stock control.
You can also print labels for individual products by using the 'Print Label' button on an individual product page.

Related Articles
Setting up your DYMO 450 Turbo label printer for Windows PC
Before Getting Started: Before printing from your Dymo, make sure you have the correct Label sizes supported with Vend. While Dymo supports a range of different label sizes we recommend 11352, 30336 or 1738541 Dymo labels. Here is a video which goes ...Setting up your Quick Keys for Mac and PC
Important: If you are using the Vend sell screen on Mac or PC, make sure you setup your Quick Keys using the following guide. Creating your Quick Keys layout Adding products to your Quick Keys Layout Managing existing Quick Keys layouts Enabling and ...Add your mPOP device to the Vend App:
To add your mPOP device to the Vend App: 1. Open the Vend Register app and Tap the menu icon. The sidebar will open. 2. Select Settings -> Hardware -> Add Printer to generate the “add printer” form: hardware menu 3. Tap the 'Printer Model' section to ...Setting receipt template
Vend uses Receipt Templates so we know what information to put on your receipt, and how to format it so that it will print nicely on your receipt printer. Before setting up your receipt template, you'll need the following information: What type of ...Setting up your Star 650II BTI Bluetooth printer for your iPad
Device checklist: In order to set up your receipt printer with your iPad, you'll first need to make sure you have all the peripherals needed. Cables: As the 650II BTI is Bluetooth it does not require any cables to connect it to your iPad. The only ...